In 2002 I began to experiment with ideas on how to bend wood across complex three dimensional planes. In the course of doing this I inadvertently created a tapered elliptical cone shape that, at first glance, looked ideal for a dining table base.
After building a prototype of the cone my next challenge was making the top. After heeding advice to "keep it simple" I settled on a pure elliptical oval shape with bookmatched grain and flat edge apron. A 1" high stainless steel plinth was added to the underside of the base. The resulting table was finished in Tobacco Mahogany, and named the Ellipse Dining Table.
Although the resulting table looked OK, there was something about it that was just plain missing. What bothered me most was the finish - which was a basic chocolate/mocha/expresso brown. At the time this was a safe finish to use, because just about every professional in the interior design industry was using it in one form or another since it "went with everything".
One could probably credit Holly Hunt and Christian Liaigre with first introducing this look to the high end of the market in the 1990s. By the early 2000s, however, the finish was everywhere and I soon realized that to be the main problem. Namely, because of the finish this table was looking like everything else out there - even the cheap dross knock-offs that were now beginning to flood the market by the containerload from offshore.
By 2006 I decided to refine the design with some subtle changes. I began by using a wood called Nero Chaquiro, which is a lesser known species that comes from an FSC certified forest in Brazil. In addition to being certified as sustainably harvested the use of this wood also helps support an indigenous community living along the banks of the Amazon River by providing a tangible incentive for the peoples living there to manage their surrounding forest responsibly.
The main structure of the table was crafted out of FSC certified ply, which was also NAUF and CARB2 compliant due to the fact that there were no added urea formaldehydes in the glues and binders. To minimize the heaviness of the top the grain pattern was changed to sunburst and the edge profile became a deep undercut bevel. The stainless steel plinth was removed in lieu of a small convex inlay of Narra being added as a subtle detail. The resulting table was finished in a low-VOC water based urethane, and renamed the Ellipse II Table.
Taken together these changes created a more sculptural look to the design, and the response from the design community was tremendously positive. Our ability to custom tailor this design to meet the requirements of each individual client has since resulted in the Ellipse II Table becoming one of our most popular offerings today.
In October 2008 a custom commission of this table for interior designer Wendy Blount was even published in an issue of Metropolitan Home magazine.
Thanks to the positive response this article received, the table photo was subsequently republished in the book "Glamour: Making it Modern" by Michael Lassell.
Sustainable, Environmental, Eco Lifestyles, Healthy, All Natural, Home and Garden, Interior Design, Eco Friendly, Green Furniture, Green Furnishings, Green Designs, FSC Certified, Reclaimed Materials. Organic, LEED compliant, NAUF. CARB2, Bamboo, Natural Fibers. Non-Toxic, low-VOC, Non VOC, Natural Finishes.
Tuesday, May 31, 2011
Friday, May 27, 2011
Custom Display Case Project
Attached is an image of one of the current projects we have on the go, which is for 6 massive display cases that will be going into a sports lounge.
Each case measures 39" wide x 24" deep x 102" high. Crafted from Ribbon Sapele each unit will have a mirrored back, glass shelves, an inset glass face and locking glass doors on each side.
The opening in the plinth base will receive a fitted grill to conceal air return plenums that are going to be set into the floor. Recessed halogen lighting on swivelling fixtures will be fitted into the header.
Wednesday, May 25, 2011
Landis Coffee Table
Measuring 44" long x 21" wide x 16-3/4" high the Landis Coffee Table features an elliptical oval top with a deep undercut bevel running completely around the perimeter of the edge.
The stainless steel legs are easily removed for shipping, and this design can be customized into different sizes.
Crafted from FSC certified wood, non-UF glue and low-VOC waterbased finish this design has been described by one gallery owner as "an excellent representation of modern 50's design with a 21st Century twist."
Price: $675.00
Tuesday, May 24, 2011
A Custom Made Kitchen
Although we typically specialize in building free standing pieces of custom furniture, it's not uncommon for us to also do built-ins and cabinetry such as kitchens.
One current project is for clients who are looking for a custom kitchen that is more "furniture-like" than what is currently available in the market. In other words: they're looking for something more refined than melamine boxes with doors.
For this project the cabinet interiors are to be finished in maple ply, with all drawer boxes being made of dovetailed solid maple running on Blumotion linear ball bearing slides. The cabinet exteriors will be finished in a 2-tone solid urethane.
The following series of images will show the progression of this project from the completion of the renovation stage through to the final installation.
At this stage the contractor is nearly done with his work. All electrical, plumbing and gas lines have now been located, and the drywall is mostly set in place. Once the hardwood floors are installed this room will be ready to receive our cabinetry.
The hardwood floors are now installed and the finishing touches have been made to the drywall. The appliance guys have already plunked the massive stainless steel fridge in the far corner, which will make it all the more difficult for us to do our work.
The lower boxes are set into their approximate locations, and a great deal of effort then goes in to making sure everything is square and level.
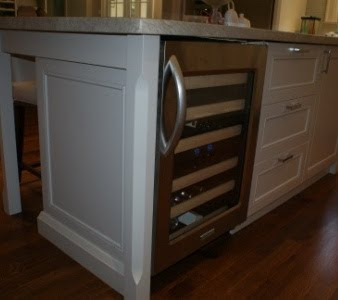
The upper cabinets, range hood, fridge enclosure and headers are now installed, and the fridge and oven have been set in place. The photos that follow show the completed kitchen, including counters, appliances, backsplash and crown moldings. Typically when people talk about having something custom made they're referring to having cabinets made to a particular size, faced with doors of a certain style that have also been finished to match a specified colour or stain. In our world building something "custom" means providing addition service that, hopefully, also exceeds a client's expectations. For example, for the kitchen island we pointed out a minor detail in the fine print of the wine fridge specifications that required an additional .25 inches to be added to the overall cabinet heights to allow for sufficient ventilation of the fridge. This change was made at no extra charge, and provides adequate ventilation to enhance the long term performance of the wine fridge. Also on this particular kitchen the client wanted to have the window faucet centred on the main window so that she could look out into the yard and easily see where her kids were playing. Although it is the base cabinets themselves that are usually centred under the windows, we were able to make the changes necessary to ensure the client ended up with the kitchen of her dreams. When it comes to having something custom made it is often attending to the smallest of details that makes all the difference for making a client happy.
Monday, May 23, 2011
Custom Commission - Kidney Shaped Desk
What follows is a series of photos of a recently completed custom commission for a Kidney Shaped Desk. These images will form the basis for a series of blog posts that will explain this desk in great detail, explaining not only the various holistic woods used but also the process for making the gold, copper and silver inlays that have been fitted into the pencil drawer.
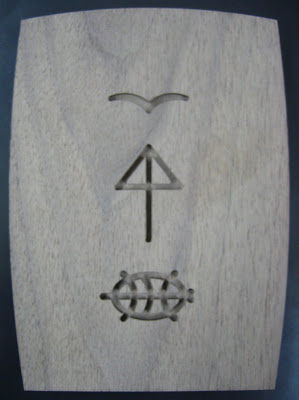
This is the initial walnut blank with recesses cut to receive the gold, copper and silver inlays. After the inlay work is complete this piece will become the lid of the box located inside the pencil drawer.
The gold and silver inlays were cast using a lost wax process. This image shows the mold and wax casting for the silver Turtle inlay.
The mold and wax casting for the Eagle inlay, which ended up being made of gold.
Benchwork on the Turtle inlay.
Benchwork on Eagle inlay.
Cleaning the casting of the Eagle inlay.
Polishing the Eagle inlay.
Handscraping the copper Tree inlay. Since it is not practical to cast copper, this inlay was made of bar stock that was seamlessly soldered together.
Preparing to fit the inlay into the wood.
After much polishing and finessing by hand, the final fit is achieved.
The wood lid can now be sanded in preparation for gluing the inlay into place.
A protective Lanolin finish is carefully applied by hand to the Black Walnut lid and sculpted inlay pieces that will function as finger pulls under the drawers. It is highly relevant that these pieces are all located in areas that will be frequently touched, since this will allow the active holistic molecules of the Black Walnut wood to come into direct contact with the skin of the person using the desk.
The finished lid and finger pulls, ready to be fitted into desk.
Front view of the completed desk.
A closer view of the end detail of the desk.
Detail view of top, showing Macassar Ebony top apron and inset of black Tuscany leather.
Detail view of side drawer.
Pencil drawer - closed.
Pencil drawer - open.
Interior of pencil drawer, showing inlaid lid of Black Walnut. The trays on either side are made of Sassafras, which is a holistic wood known for its aromatherapeutic properties. The box portion below the inlaid lid has been crafted from a wood called Hawthorn, which is also known for its aromatherapeutic and Ayurvedic properties.
Detail view of inlaid finger pull below one of the side drawers. The finger pulls are made of a special cutting of Black Walnut wood, which has traditionally been used by Native American medicine women for its holistic properties.
The properties of all of the holistic woods, and the story behind the gold, copper and silver inlays in the lid, will be explained in greater detail in a subsequent post.
Can't You Hear Me Knocking?
Although today is a long weekend I was in my shop finishing a special project for one of my clients. Because there's a good chance that this client also follows my blog I won't be posting pictures of what I was up to just yet - to maintain some air of surprise.
In the meantime I'm posting a link to a song by the Rolling Stones. It came on the radio today, and it's a song I haven't heard in YEARS.
It's such a great tune!
For the record: I'm a lousy dancer, but I was dancing a mean boogie to this song today, but only because no one was in my shop to see me doing it.
Sunday, May 22, 2011
Edgar the Tree
Yesterday's post showed an image of fruit blossoms that have surprisingly appeared on a PawPaw tree in our backyard.
Today's post is of a maple tree that is growing nearby.
Several years ago, after a visit with friends, I found my parked vehicle covered in hundreds of maple keys that had fallen from nearby trees. On a lark I gathered handfuls of these keys to plant them in small starter pots to see what would happen.
In short order the bulk of these seeds sprouted into tiny seedlings, and over the course of the Summer I either gave away or transplanted all of them in various locations. The empty pots (including those of the seeds that didn't take hold) I left at the side of the house, and subsequently forgot about them.
Months later I was surprised to notice a gangly seedling in one of the "empty" pots. This little guy was obviously a late bloomer, and now that it was late in the season I was hard pressed for ideas on where to plant him before Winter set in.
Without much thought I decided to place this seedling in the middle of the garden at the back of the yard, to see if he'd even survive the first snow. Survive he did, and by the next Spring it was growing by leaps and bounds.
In just a few year's time this tree has grown to over 20 ft. tall, and is now a permanent fixture in the yard. This tree's shade is especially welcome on hot Summer afternoons.
This tree has also been named. We call him: Edgar.
Subscribe to:
Posts (Atom)