Showing posts with label Toronto. Show all posts

Monday, January 9, 2012

Custom Chess Table

A few months ago we received a request to make a Bow Tie Pedestal Table in a custom size of 19-5/8" long x 19-5/8" deep x 20" high.


The purpose of this table was to provide an elevated playing surface for a stone chess board the client already had.


The resulting table was crafted from a bundle of quarter cut figured Walnut veneer.

Thursday, January 5, 2012

Television Interview with Howard Green of BNN

A few weeks ago a producer from Business News Network (BNN) called asking me to participate in an interview entitled "The Business of Craftmanship".

The focus of the segment was to discover how people can turn the craft of making things into an actual business, and in addition to me discussing the craft of fine furniture making there were also interviews with custom guitar maker William "Grit" Laskin, and shoemaker-to-the-stars John Fluevog.

The interview took place last Tuesday at a gallery in Toronto called Industrial Storm, and it would be an understatement to say that I was incredibly nervous going in.


Thankfully the show's host Howard Green was incredibly professional and easy going, and his friendly, relaxed demeanor worked wonders setting me at ease before the interview began.

Howard's interview with me can be seen at the following link:

http://watch.bnn.ca/headline/#clip590938

Meanwhile Howard's interview with William "Grit" Laskin is here, and the interview with John Fluevog is here.

Tuesday, July 12, 2011

The "Big Ass" Desk

About a year ago we received a request for quotation for a number of furniture pieces going into a large custom project. One of the pieces quoted was for a custom desk.

At the time I remembered feeling just a little bit nervous about the prospect of making a massive one piece curved top that would measure almost 14' corner to corner. Not knowing whether the quote would actually materialize as an order, I didn't end up spending too much time figuring out how, exactly, we'd do it.

Well, the order did materialize, and we did figure out how to make the top.


This is the credenza that will be located on the left side of the desk. There are a total of 6 box drawers over 3 files drawers. The drawer boxes will all be dovetailed solid maple running on Blumotion self closing linear ball bearing slides.


This image shows the addition of the side cabinet for CPU storage. There will be a removeable angled back added to this cabinet to allow for wiring access.


The curved modesty panel is bolted to the CPU cabinet.


The end gable is added to the far side of the modesty panel. The removable panel for the CPU cabinet can be seen on the right.


The "big ass" top is added to the "big ass" desk. It goes without saying that putting an undercut bevel edge around all 3 sides was more than a little challenging.


This view shows the inside of the desk, including the knee space.


I'm not certain whether this is the biggest desk we've ever made, but this is definitely the biggest desk we've ever made for a home office.

This piece has now been disassembled for sanding and finishing.

Monday, July 11, 2011

Tekendoos Keepsake Boxes

The inspiration for these keepsake boxes comes from a “Tekendoos” (a Dutch word for “drawing box”) that was given to me by my Grandfather when I was a small boy.


I have cherished this gift for almost 50 years, and it still sits on my desk to this day.

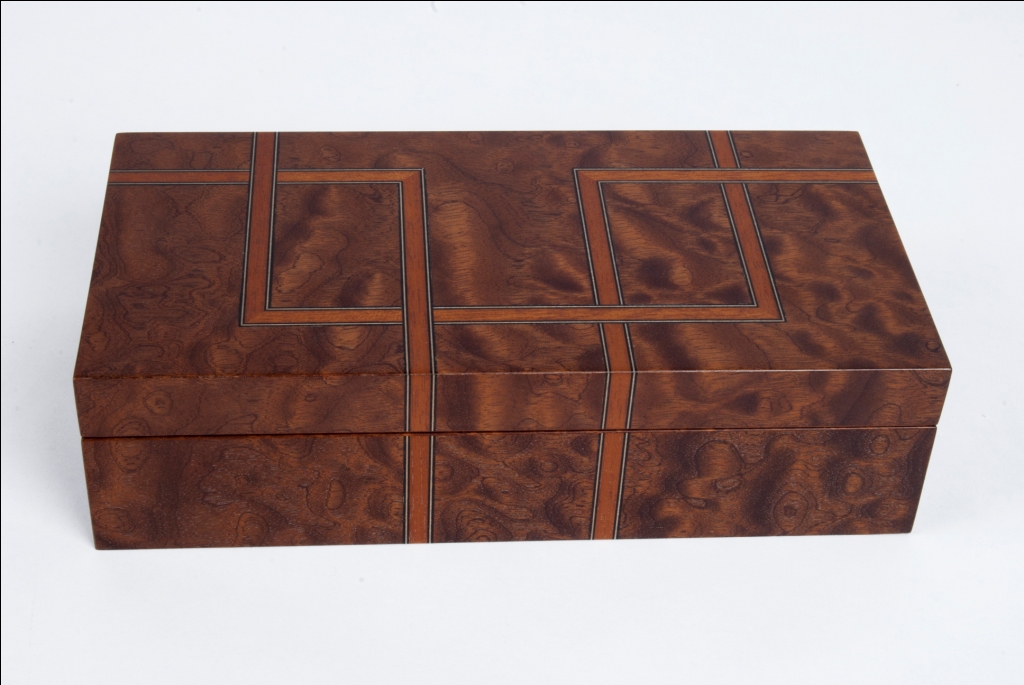
The boxes shown here have been constructed from mitre folded Baltic Birch ply, with exteriors clad in various species of exotic wood that have been inlaid with purfling banding. The hinges are solid brass, and the interiors are felt lined.

The overall dimensions of each box is 10” by 5” by 2-5/8” high


The box shown above has been crafted from Karellian Birch Burl and inlaid with Mahogany, Maple and Indian Ebony.


The above box is made from Zebrawood inlaid with Mahogany, Maple and Indian Ebony.


This box is made of Kevazingo inlaid with Tulipwood, Maple and Indian Ebony.


The above box is made of Pommelle Sapele inlaid with Mahogany, Maple and Indian Ebony.


The keepsake box shown above is made of Bubinga inlaid with Tulipwood, Maple and Indian Ebony.

Several of these Tekendoos Keepsake Boxes will be on display at The Guild Shop in Toronto, as part of the "My Grain" exhibition which opens on July 16th.

Aquaria Console

The Aquaria Console measures 42-1/2" long by 10-1/2" deep by 29-1/2" high. The high gloss figured wood top appears to float over the base since it rests on concealed cross ribs that are set between the long curving aprons.

The aprons are attached to the curved solid legs by means of mortise and tenon construction. An optional drawer extends from one end by means of Blumotion linear ball bearing slides. The drawer box itself is made of dovetailed solid maple.


The console above is shown with a solid Walnut base that has been stained Dark Chocolate. The top is figured Crotch Walnut which has been center butt matched, and stained to complement the base - albeit with a high gloss finish.


The legs and aprons on the console above are made out of solid natural Bubinga. The figured wood top is rotary cut Bubinga, which is sometimes called Kevazingo.


The apron and legs on the console above have been made out of Curly Maple that has been stained a medium Chestnut colour. The figured wood top comes from a rare sampling of Curly Birds Eye Maple that has been stained Chestnut to match.

The console below has legs and apron made out of natural solid walnut, with a natural Crotch Walnut top.


The latter two consoles are currently on display at The Guild Shop in Toronto - ready for the "My Grain" exhibition which opens on July 16th.

Thursday, July 7, 2011

Custom Furniture for a Ritz Carlton Hotel

The following images are of some custom furniture pieces we made for the public areas of a Ritz Carlton hotel.


This console measures 72" long x 24" deep x 33" high. Crafted from Chestnut Pommelle Sapele the top has a reverse diamond match pattern. The sides are inlaid with natural maple. The finish is semi gloss low-VOC polyurethane.


This side table is made of Chestnut Ribbon Sapele with ebonized inlay details, and finished in semi gloss low-VOC polyurethane.


Several variations of these round tables were made for a cocktail lounge located in the lobby of the hotel. The plinth has a subtle tapering cone top surface which had a challenging sunburst grain pattern applied to the face. The hexagonal tapering cone pedestal conceals hidden metal rods which provide the necessary strength to support the 38" diameter top.

Monday, July 4, 2011

Honeycomb Cocktail Table

Thanks to a conversation I had in 2005 with a designer by the name of Jill Salisbury, I began looking deeper into ways of incorporating Biomimicry to some of my furniture designs.

What is Biomimicry?

Biomimicry is the examination of Nature, its models, systems, processes, and elements to emulate or take inspiration from in order to solve human problems. The term biomimicry and biomimetics come from the Greek words bios, meaning life, and mimesis, meaning to imitate.

The idea of imitating Nature through design was something that holds great interest for me. Before long I was sketching rudimentary table shapes that were comprised of the 6-sided hexagonal walls of a common honeycomb. Several years later this exercise resulted in a working prototype that became known as the Honeycomb Cocktail Table. The example shown here was crafted out of Chestnut Ribbon Sapele.


Measuring 45" x 45" x 16" overall height this table is comprised of 7 individual hexagonal modules, with the center unit being solid and the 6 surrounding ones each having 4 closed sides and 2 open ones, with a single adjustable shelf suspended inside each.

The theory behind this design was that each of the modules would function as individual storage pods, which could also be independently rotated towards the center in order to hide the clutter of whatever was stored inside. In this way the table would have the clean look as shown in the photo, yet conceal the fact that abundant storage capacity was available inside.

While the idea was great in theory, the practical application did not work quite as planned. The biggest problem was that any unevenness in the floor was quickly telegraphed through the pods, creating a highly uneven top surface depending on how and where these pods were placed on the floor. When all was said and done it became quite clear that this design will function best only if the pods can somehow be fastened together as a single monolith.

Another issue was price point. Given the time it took to build and finish this table it was simply not possible to make this design cost effective in a way that would justify a price point at a reasonable perceived value.

Conclusion: Although the design is cool, it`s simply not practical to produce on an ongoing basis. That said, this Honeycomb Cocktail Table is probably destined to remain as a one-off prototype.

Friday, June 10, 2011

Storage Crates for Preserving Jars

A few years ago my wife started putting some serious effort into maintaining an organic garden and preserving many of the vegetables we harvest from there. Every year our biggest challenge is keeping the local groundhogs and rabbits from using this garden as a personal buffet.

While there is no shortage of fresh vegetables to be enjoyed during the summer months, we've come to realize that it's also good to preserve some of the bounty that we don't eat for the wintertime.

This has resulted in the accumulation of many boxes of preserving jars in recent years, and as I soon discovered these things become quite heavy and cumbersome once the jars are filled with preserves. To properly store and organize these boxes I ended up designing and making some simple plywood stacking crates.


About a week ago my wife posted pictures of these crates at a site called Ravelry.com, and given the positive feedback these things received I've decided to create a blog post to explain in detail how they are made.


The drawing above shows in detail the cutlist of materials, plus how to assemble these boxes. The example shown was designed to hold a case of 12 x 1 litre (approximately 1 quart) jars. I would urge anyone who is thinking of making these for themselves to BUY THEIR CASES OF JARS FIRST, before making the crates - the reason being that there are no consistent sizes of jars and/or cardboard boxes for holding the jars, even from the same manufacturer. That said, the sizes provided should be adjusted to the ACTUAL ones you get.

To make crates for other jar sizes please adjust this drawing accordingly.

In this instance (for the case of 12 x 1 litre jars) the exterior dimensions of the cardboard box is 15-3/4" long by 11-5/8" wide by 7-1/8" high. On the length I added 1-5/8" to the interior size to allow for 1/8" of clearance plus 2 thicknesses of 3/4" styrofoam at each end. (The styrofoam inserts will be explained later). On the interior width an allowance of 1/8" for clearance was made, while on the height I allowed a full 1" of clearance to allow for clearance of Skid Rails (that lock the crates to one another when they're stacked), plus allow for the cardboard lids to be folded closed without putting any pressure onto the tops of the sealed jars in the process.

The crates are constructed out of 3/8" thick standard Fir or Spruce plywood sheeting, which is available at almost any building supply store.

Please note that there are no consistent thicknesses to plywood sheeting either, so the cutlist provided (which is based on the assumption of 3/8" material thicknesses) may need to be adjusted for compensate for thickness variations in the actual material you use.

The cutlist is shown in the upper right corner of the attached drawing. Because of how thin the plywood material is it is not practical to try screwing these crates together. I used a wood glue called Titebond 3 to glue the ends to the sides, with fine brad nails (staples can also be used) to hold the pieces together while the glue sets up.

The bottom was then attached using glue and brad nails, and the corners were then braced with Vertical Cleats that were glued and brad nailed over the butt joints as shown. After the boxes were assembled a pair of Skid Rails were attached to the underside of the bottoms to allow the crates to nest securely on top of one another. The Skid Rails should be carefully sized and positioned so that the crates can get stacked evenly on top of each other, without binding.

Before assembling the ends to the sides I machined a pair of cutouts into the ends that would function as handles. For fun I used an inverted pyramid shape cut out with a router. At each end of the cardboard box (between the box and the plywood end of the crate) I inserted a 3/4" thick piece of styrofoam with a "V" shaped cutout to allow clearance for fingers when reaching in and out.

Hopefully this information is helpful to anyone wishing to make these for themselves.

Friday, June 3, 2011

Inamorata Casegoods - The Story Behind Their Creation


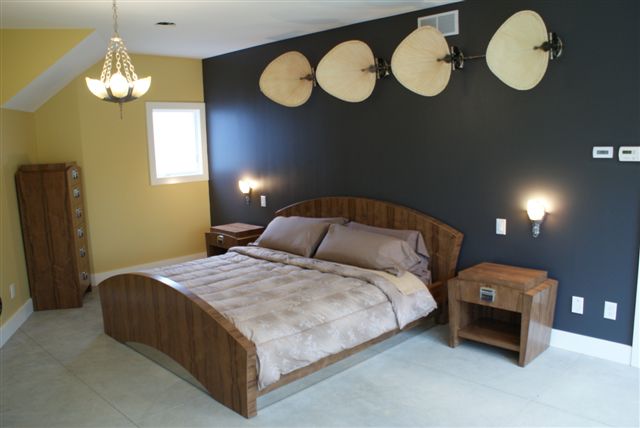
A few years ago we received a special commission to make a custom Irenic Bed out of East Indian Laurel. In addition to the bed the clients were keen on having some complementary casegoods made - namely a pair of dressers and a pair of night stands.

Inspired by the sweeping arc of the bed design we conceptualized a casegood profile that would emulate the silhouette of the Diego Humidor.

The resulting casegoods are shown below. To counterbalance the warmth of the wood we introduced the coolness of steel through the use of large polished steel pulls. Given the vibrant presence of the wood grain it was necessary to make the size of the custom pulls substantial, with the grips and detailing crafted out of black rubber.


The back of the main dresser was fully finished, which is a standard feature incorporated into all of our custom furniture designs.


The tall chest shown below was initially conceived of as a shorter dresser until a problem was discovered with how the builder proportioned the master bedroom. This unexpected glitch was quickly resolved with the suggestion that we transform the dresser into a vertical chest of drawers, thereby allowing it to fit a niche in the room.


Once again the back is fully finished.


Each of the night stands has a single drawer, with storage below for books.


In tandem with this we crafted another version of the Irenic Bed as shown below - this time out of natural Cherry. Because of the subtleness of the Cherry grain we decided to cut the wood at slight angles to create a radiating pattern to symbolize a rising Sun.


For this commission the client requested large center drawers on the dresser, and smaller cubbie drawers on each side. Since the wood grain of the Cherry was not as pronounced as the East Indian Laurel, a more subdued satin nickel pull was selected.


This 7 drawer cabinet is called a semainaire, which is derived from a French word used to describe a lady's lingerie chest having one drawer for each day of the week.


One key feature of this custom piece is the discrete locking compartment that was integrated into the underside of the top. The compartment was lined in black Tuscany leather. Both the lock and hinges were plated in 18K gold.


The night stands each feature 3 large drawers...


and a fully finished back.


This corner detail shows the cascading grain pattern on the pilasters.


Inlaid into the back of each of the cabinets was a small convex inlay of a wood known as Narra. This particular selection of Narra carries a special provenance in the world of sustainable forest management because it comes from the last remaining board known to exist of the very first wood to be sustainably harvested on the Solomon Islands in the early to mid-1990s. This Narra made its way into North American by way of Eco-Timber in California.


All drawers are dovetailed solid maple, running on concealed linear ball bearing self-closing glides.


For management of various electronic devices some custom charging stations were built into each of the night stands, so that cell phones, Bluetooths, Blackberrys and digital cameras could be simultaneously stored and charged.

The power bar and excess wiring were concealed under a removeable tray that was inlaid with slots and pockets for storage.


This resulting casegoods collection is called Inamorata.

Inamorata comes from the Latin words "in" and "amore", with the loose translation being "to inspire with love".


Sustainable, Environmental, Eco Lifestyles, Healthy, All Natural, Home and Garden, Interior Design, Eco Friendly, Green Furniture, Green Furnishings, Green Designs, FSC Certified, Reclaimed Materials. Organic, LEED compliant, NAUF. CARB2, Bamboo, Natural Fibers. Non-Toxic, low-VOC, Non VOC, Natural Finishes.